


| « Creativity: Still Alive After 25 | Warp Speed in a Convertible » |
Feature Mon Mar 02 2009
Slatted End-Grain Side Table
 Recently I decided that making simple furniture is something I should do more often, and in doing so, I should make some items others could do at home with a little knowledge and simple tools, or access to some other bigger tools.
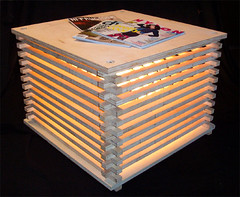
This project is something that I've been thinking about for the past few months, a Slatted End-Grain Side Table with storage. I like plywood, I like it a lot, and multiple layers of wood stacked up just looks cool. Keeping with the theme, the project I had in mind was something that someone could make with limited tools and -- importantly -- stuff one could get at the local home center.
What You'll Need
Four 2' x 2' pieces of 3/4" birch plywood. Make sure it is plywood and not that fiber board stuff, which doesn't have that nice end-grain look. I used birch veneered plywood because it's sanded on both sides and has very few knots.
Four 24" quarter-inch threaded rods, nuts and washers and four cap nuts. This is what keeps the whole thing together.
A drill or drill press with a 21/64" bit and a small circle saw bit 3/4" or a forstner bit.
A way to cut slats of wood. Ideally a table saw, but you can use a circular saw if you set up guides and the like. I used a band saw and a guide at my
father's shop.
How to Do It
Making this side table is a relatively easy thing to do, provided you take the time to make your cuts and drill your holes correctly. The table I made is two feet square, but if you are so inclined to make it a different shape or size, go for it.
First off, cut two of the 2'x2' sheets of plywood into 1" slats; you should get about 46 slats and two pieces of scrap. If you have no way to do this with plywood, use an equivelent sized wood such as a square pine molding. It is sold in length, so you can make all your cuts with hand tools.
Next, using the 21/64" bit, drill a lot of holes: one at each end of the slats. Measure in from the end of the slat and mark where you want the rod to be -- I suggest an inch and a half for that Lincoln Log look. This takes awhile, so take your time (a drill press and a jig comes in really handy for repetitive tasks like this.) Measure, mark and drill one of the uncut sheets of ply with the 21/64" bit -- this will be the bottom of the table. The final sheet of ply will be the removable top; measure, mark and drill with the 3/4" saw bit or the forstner bit, which will leave room for the rods and nuts; the rods, nuts and cap nuts keep the top of the table in place. Take two of the slats and with a slightly larger bit -- something the size of the nut -- and drill in about a quarter of an inch. Set these slats aside for the bottom of the table.
I like the raw, unfinished look of the plywood, but you may not, so now is the time to paint all that wood. I suggest a water-based clear coat, sanded between applications.
After everything is dry it's time to put it together. Take two rods and put washers and nuts on the bottom; thread one of the set aside slats onto the two rods, and repeat with the other pair of rods. The nuts should be flush or just inside the plywood, which will keep the rods from scraping up your floor. Use some thick felt cushion pads to cover up the holes. Set aside the sheet of ply, as the bottom goes on next to create a base.
Next, start putting all the slats on the threaded rods, alternating directions for that open affect. When done with all the slats, bolt everything down snugly. You will notice some extra length in the rods; I tried to avoid this I couldn't find an 18" threaded rod anywhere, so to deal with this I simply used a hacksaw and cut off the excess. The best way to measure where to cut is to put an extra nut on the threaded rod and cut from the top of that. Removing the second nut will rethread the rod, so to speak. Then put the cap nut on.The last step is to put the top on, and enjoy your new table.
The table can be used for storage or as a lighted accent piece to your living room by simply putting a small diffused lamp inside with a low wattage bulb. For a clean look, drill a hole in the center of the base with the 3/4" saw bit and thread the cord through the bottom.
About the Author
Christian Scheuer, an artist, photographer and builder of things, works for a small gourmet bakery in Evanston, bringing sweet goodies to the masses in various coffee shops in and around Chicago. In his downtime, he makes "stuff for people who like stuff" and keeps a blog about his varied interests in design and things with wheels.


Bill X / March 8, 2009 8:12 PM
Love your slat end table. You should sell them on your site.